Understanding the UI
Docs for LiveDoc Viewer v0.4.0
The LiveDoc Viewer presents your BDD test results in a navigable, real-time dashboard. This page walks through every panel so you know where to find what you need.
Dashboard Overview
When you open the viewer at http://localhost:3100, you see a layout organized
into these areas:
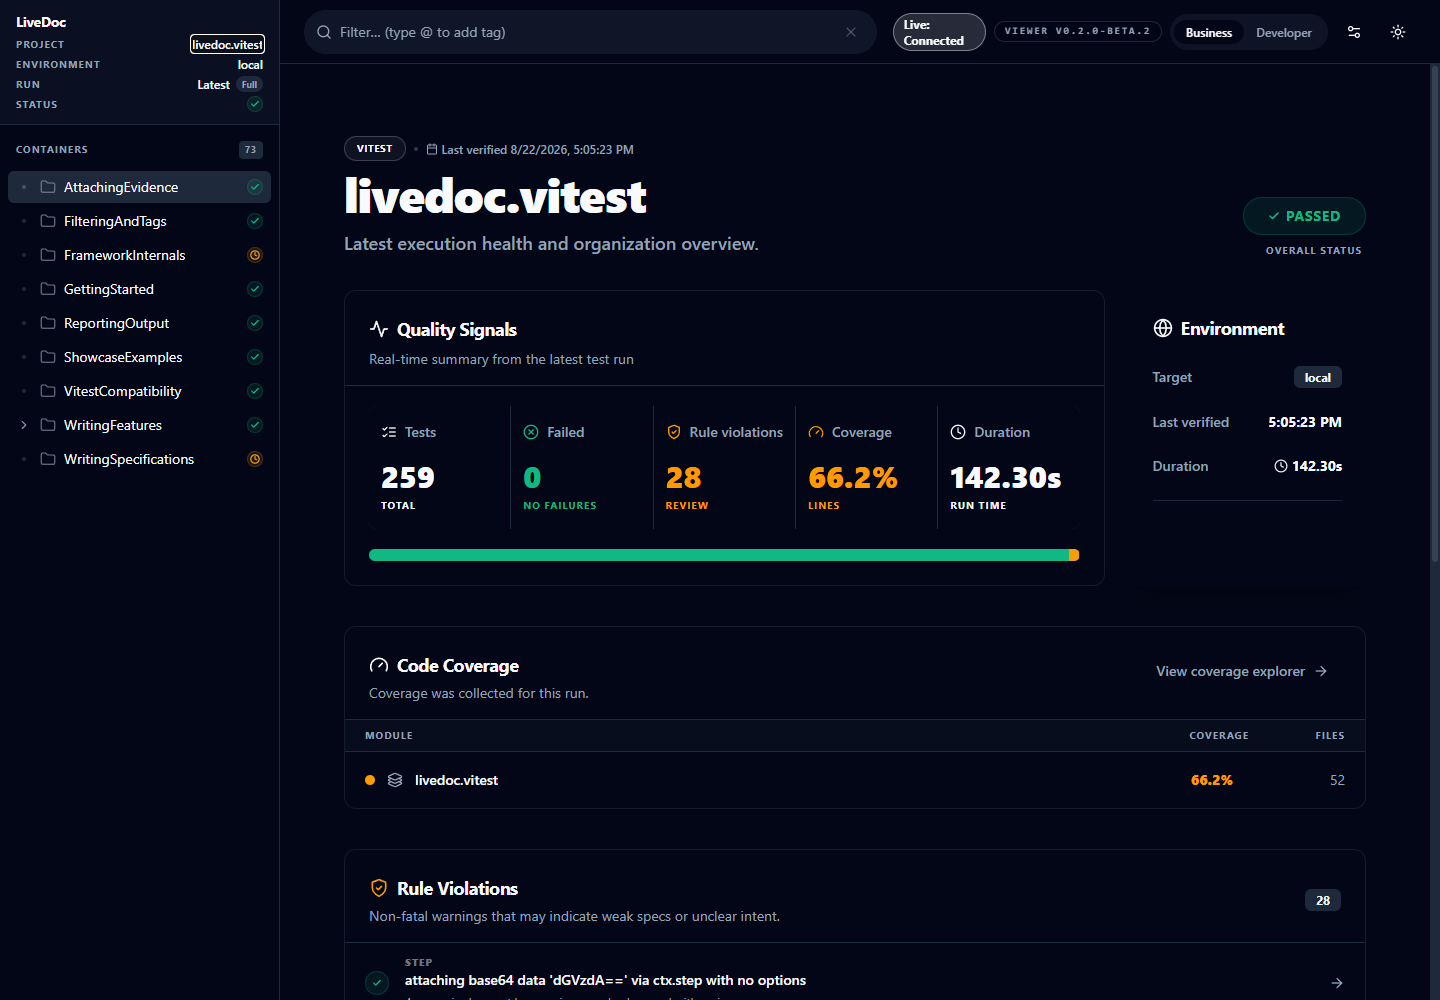
The dashboard is deliberately conditional. Coverage appears only when the run contains file-level coverage; Failures and Rule Violations appear only when there is something to review.
Project & Environment Selector
At the top of the dashboard, the project selector lets you switch between projects and environments. If multiple projects or environments post results to the same viewer instance, they appear here as separate entries.
- Project — a logical grouping (e.g.,
my-api,my-web-app) - Environment — a deployment context (e.g.,
local,ci,staging)
Select a project and environment to filter the results shown below.
See Multi-Project Setup for how to configure multiple projects posting to the same viewer.
Logical Project Grouping
Some solutions split one product into several test projects: for example,
Billing.UnitTests, Billing.IntegrationTests, and Billing.E2ETests. When
those projects run together, the viewer can present them as one logical project
so the project selector stays focused on the product instead of every physical
test assembly.
The first time the viewer detects a group, it asks whether you want to use the grouped view or keep each test project separate. Grouping uses three signals:
| Signal | What the viewer checks | Why it matters |
|---|---|---|
| Root project prefix | Shared name before test-type suffixes such as Unit, Integration, Tests, or E2E | Keeps related test projects together without merging unrelated products |
| Environment | Matching labels such as local, ci, or staging | Prevents local and CI runs from being mixed |
| Run timing | Runs overlap, or one starts within 60 seconds of another in the set completing | Treats sequential and parallel test-project runs as one logical execution |
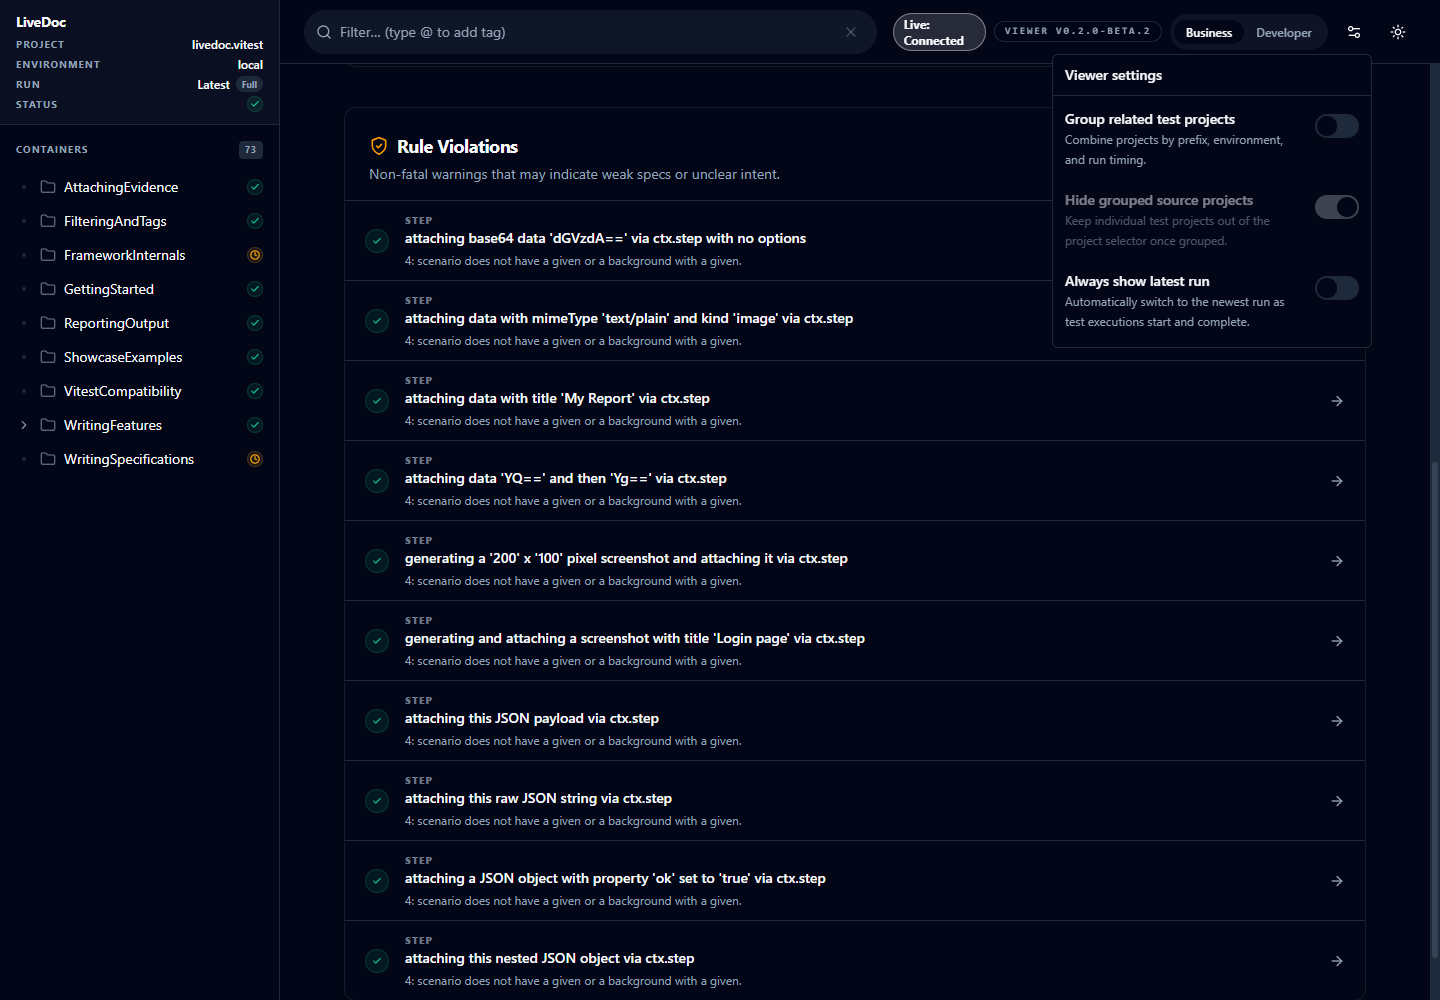
Use Viewer settings > Group related test projects to turn grouping on or off later. When grouping is enabled, Hide grouped source projects keeps physical test projects out of the project selector once they are represented by a logical group. The source projects still appear as folders inside the grouped run, so you can tell where each feature or specification came from without cluttering the top-level project list.
The selector shows only the newest logical group for each project and environment. Older grouped executions remain available from the Run menu. Enable Always show latest run when you want the Viewer to follow each new execution automatically; leave it disabled when you want the current historical selection to remain stable.
Feature & Specification Tree
The left panel displays a collapsible tree of all features and specifications from the selected run:
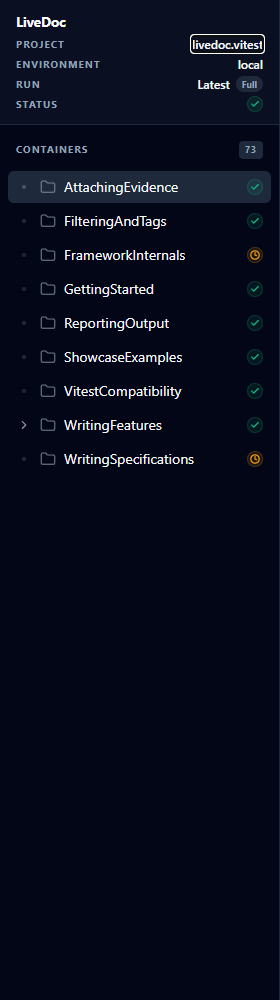
- Features appear as top-level nodes with their title and tags
- Specifications appear alongside features at the top level
- Scenarios / Rules nest under their parent feature or specification
- Status indicators show pass ✅, fail ❌, or skip ⏭️ at a glance
Click any feature to expand its scenarios, or click a scenario to open it in the detail panel.
Common roots and sidebar width
The Viewer hides redundant shared folders for every framework until the first
branch or a folder containing documents. For example, if all containers live
under Acme.Commerce.Quotes.Services.Transactor.UnitTests, navigation starts
at Authentication and ResourceProviders rather than six single-child
folders. A folder with its own documents stops shortening, so those documents
remain reachable. Vitest already strips the common filesystem root when exporting
reports; the Viewer preserves that structure and also shortens shared folders in
saved reports that still contain a redundant prefix.
This is a display choice only: reports keep their exported filesystem or namespace paths, document IDs, and totals. Existing links to hidden ancestor folders still open; hover a folder, breadcrumb, or document heading to discover its full path. Search and tag filters do not change the shared prefix.
Drag the divider between desktop navigation and results to give deeper paths more room. You can also focus Resize navigation sidebar with Tab and use the arrow keys. The sidebar starts at 280 pixels and remembers your preferred width locally, between 240 and 600 pixels. Smaller windows limit that width to leave at least 480 pixels for results, then restore your preference when space returns. On phones, Open navigation still opens the drawer; the desktop width does not affect it.
Filtering & Search
Use the search bar above the tree to filter by:
- Feature or scenario name — type any part of the title
- Tags — filter by
@tagvalues assigned to features or scenarios - Status — show only passing, failing, or skipped items
Scenario Drill-Down
Selecting a scenario (or rule) in the tree opens the detail panel, which shows:
Step-by-Step Results
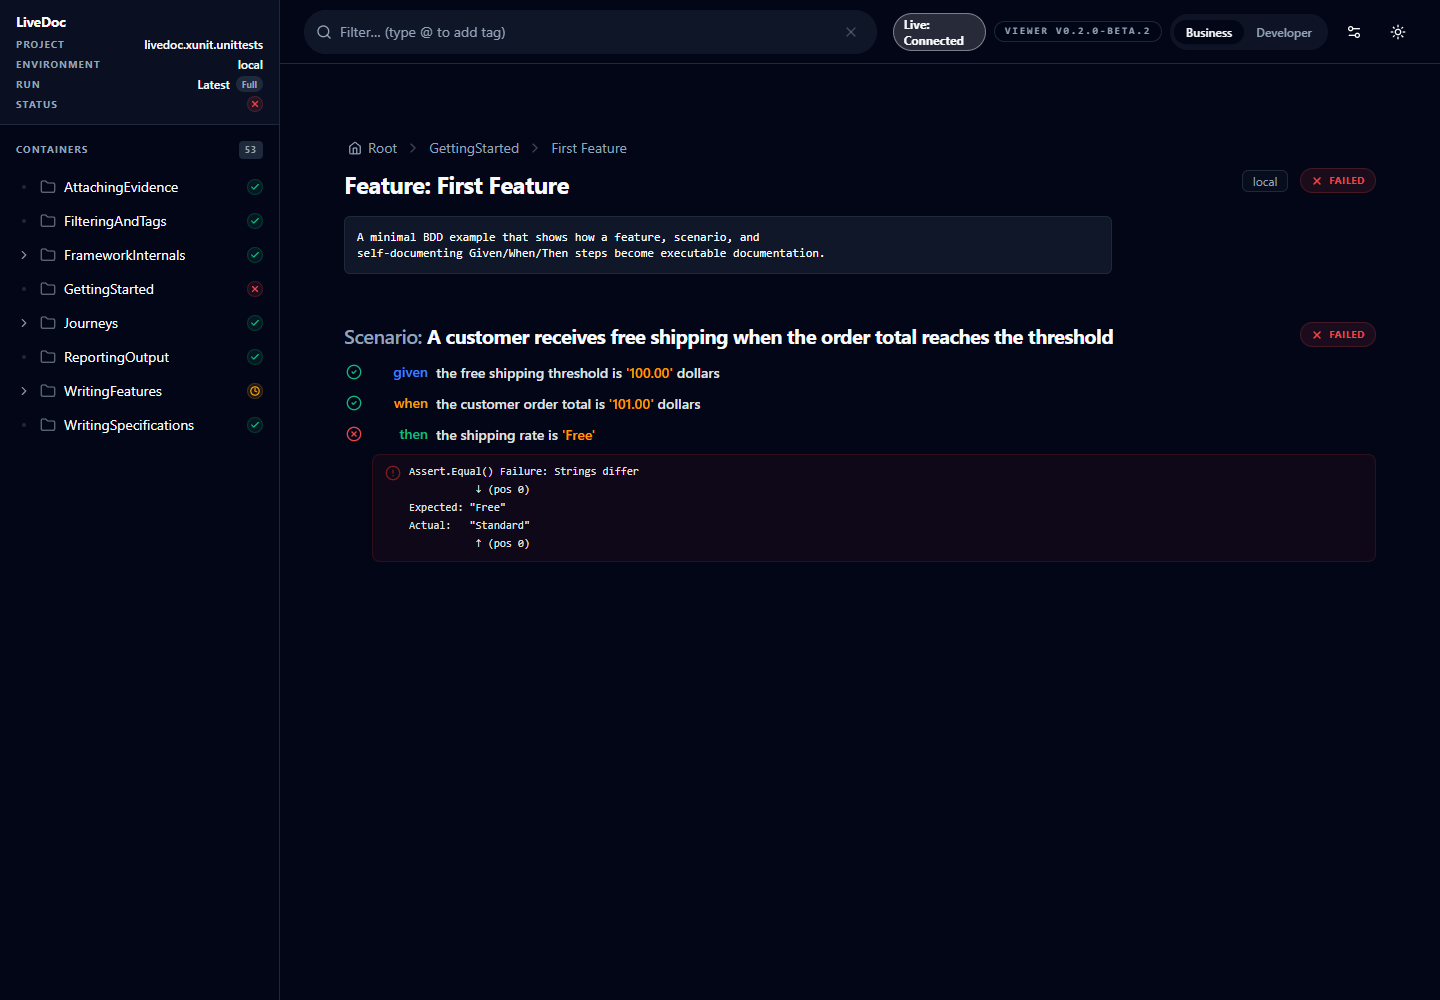
Each step (Given, When, Then, And, But) is listed with:
| Element | Description |
|---|---|
| Step keyword | The Gherkin keyword (Given, When, Then, etc.) |
| Step title | The full step title with embedded values |
| Status icon | ✅ passed, ❌ failed, ⏭️ skipped |
| Duration | How long the step took to execute |
Exploring JSON Attachments
JSON evidence opens as a structured tree. The top level starts expanded so you can scan its fields; nested objects and arrays start collapsed to keep large responses readable. Select a disclosure button to inspect a branch, including indexed array entries. The buttons work with Enter and Space.
Example: Inspecting an API Response
Open
order.json, expanditems, then expand item0to inspect its properties. Copy still copies the complete formatted JSON, even when branches are collapsed. An invalid JSON attachment displays a warning and its raw text instead of an empty tree.
Viewing Mermaid Attachments
An attached diagram can show the relationship between steps more clearly than
an assertion log. Open the attachment gallery from a step's evidence button,
then select the diagram in the filmstrip. For example, a test can attach
checkout.mmd to show the checkout paths it exercised; the viewer displays the
rendered diagram, while View source, Copy source, and Download keep
the original definition available.
For a long or wide sequence diagram, Fit initially shows the whole diagram without shrinking the gallery's controls. Use + and − to zoom, or 100% to read labels at the diagram's rendered size; scroll inside the diagram viewport to inspect the rest. The viewport can be focused for keyboard scrolling, and the gallery's fullscreen button gives the diagram more room. On a phone, fit is an overview rather than a readable text size—zoom in and scroll to read individual exchanges. The passing Attachment API → A large document-sync sequence diagram is attached as evidence scenario includes a representative multi-participant example.
The viewer renders base64-encoded attachments as Mermaid when their MIME type
is text/vnd.mermaid, text/x-mermaid, text/mermaid, or
application/vnd.mermaid (case and charset parameters do not matter), or
their filename ends in .mmd or .mermaid. A regular Markdown or text
attachment containing a Mermaid code fence remains plain text. If a diagram
is invalid or cannot render, the gallery shows an error and its source instead
of a blank image. Diagrams render in a non-interactive image preview; embedded
scripts and links are not activated.
Failure Details
When a step fails, the detail panel expands to show:
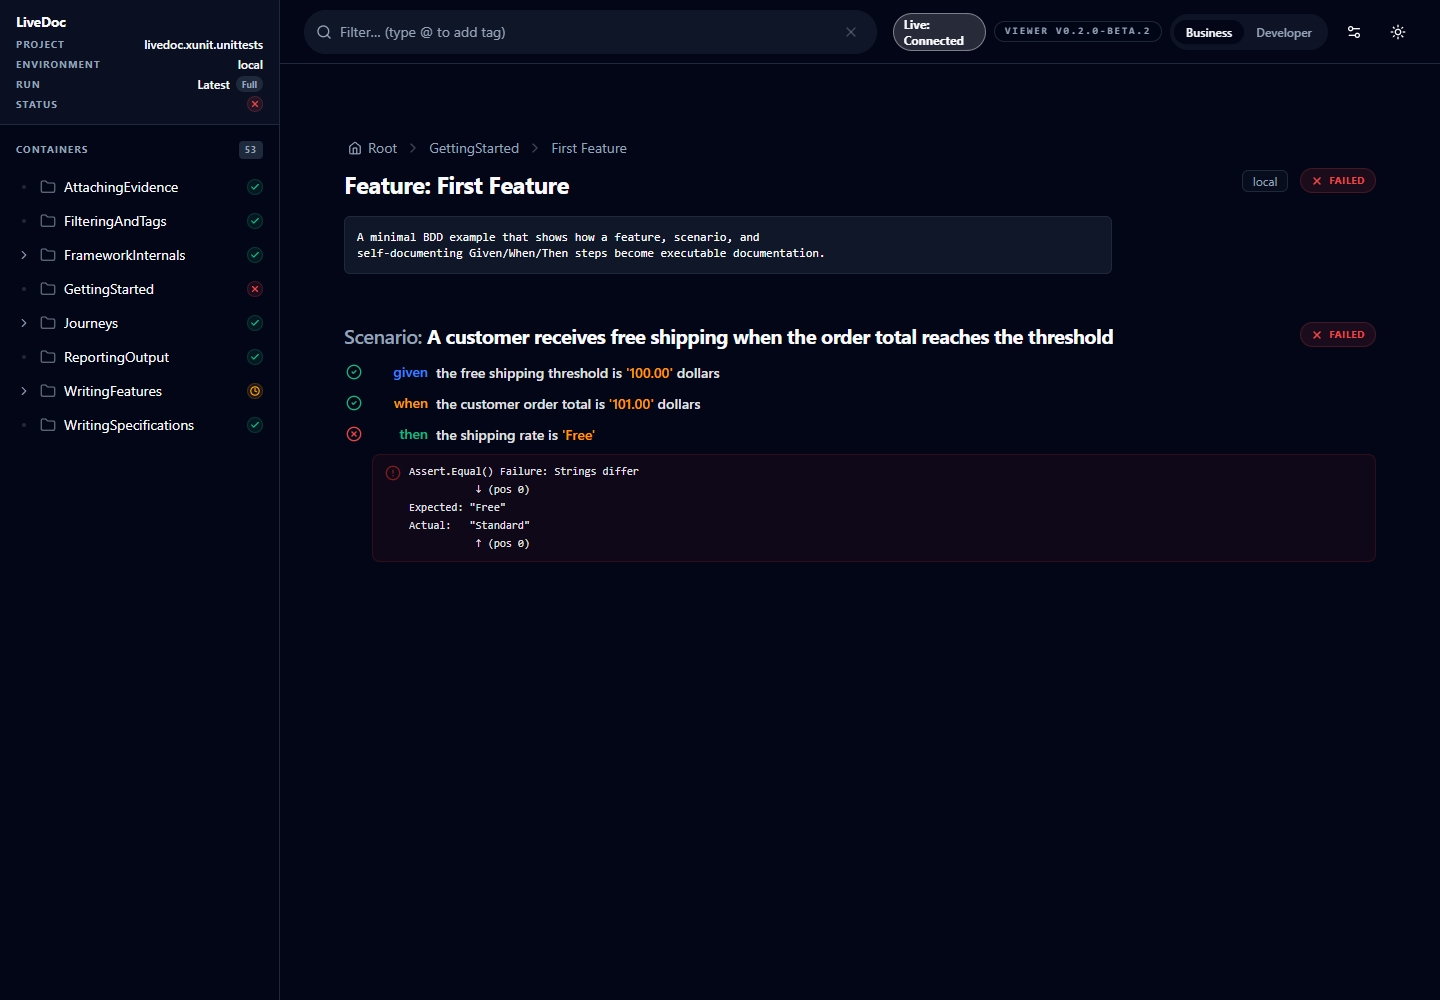
- Error message — the assertion or exception message
- Stack trace — the full call stack pointing to the failing line
- Expected vs. Actual — for assertion failures, a clear diff of what was expected and what was received
Example: A Failing Step
Result: You immediately see which step failed, what the expected value was, and the exact file and line number to investigate.
Statistics Summary
The Quality Signals card displays the current run's primary health metrics:
| Metric | What it shows |
|---|---|
| Tests | Total executable scenarios, rules, and outline examples |
| Failed | Authoritative failed-test count from the runner |
| Rule violations | Non-fatal specification-quality warnings |
| Coverage | Weighted line coverage, shown only when coverage exists |
| Duration | Full run duration, or latest-update duration for a combined partial view |
Below the card, the status bar shows the relative passed, failed, pending, and skipped result counts.
Failures and Rule Violations
Failures, code coverage, and rule violations use the same full-width visual language. Each section has a summary header and rows that navigate directly to the relevant specification.
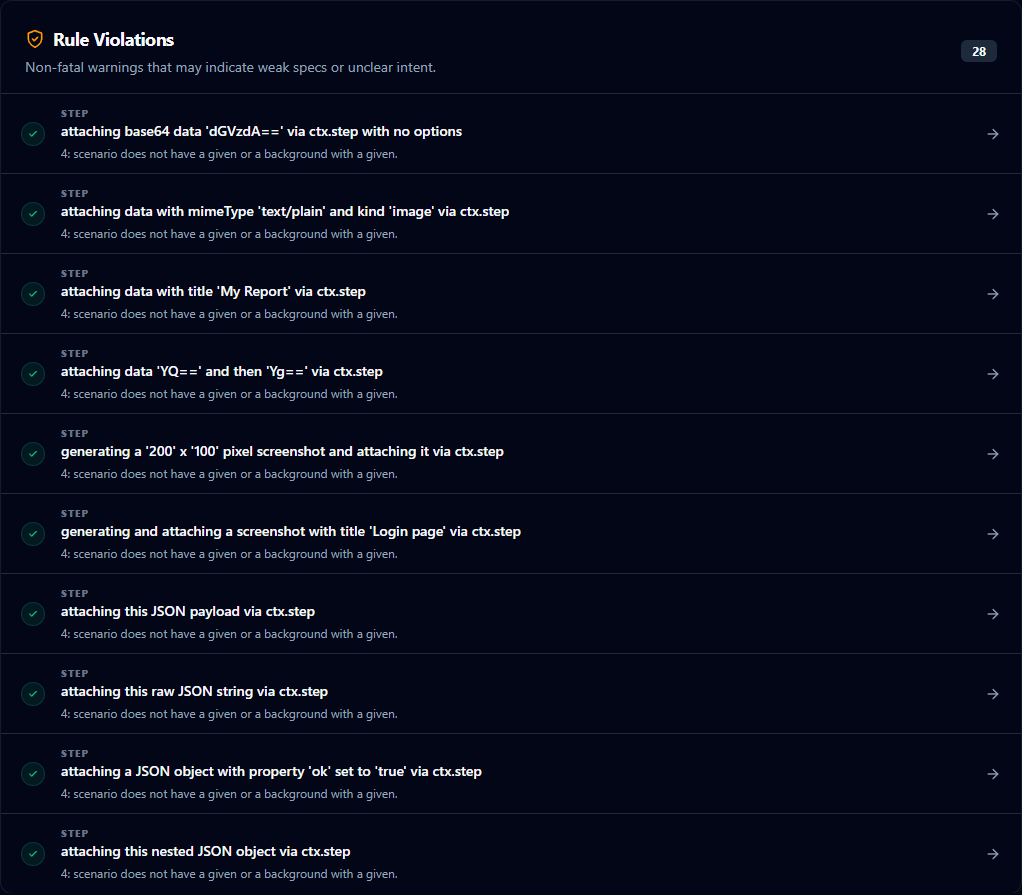
Rule violations are warnings. A test can pass while still reporting a warning such as a scenario missing a Given step.
Code Coverage
Coverage is hidden until the selected run contains file-level data. When available, the dashboard shows module health and a link to the explorer.
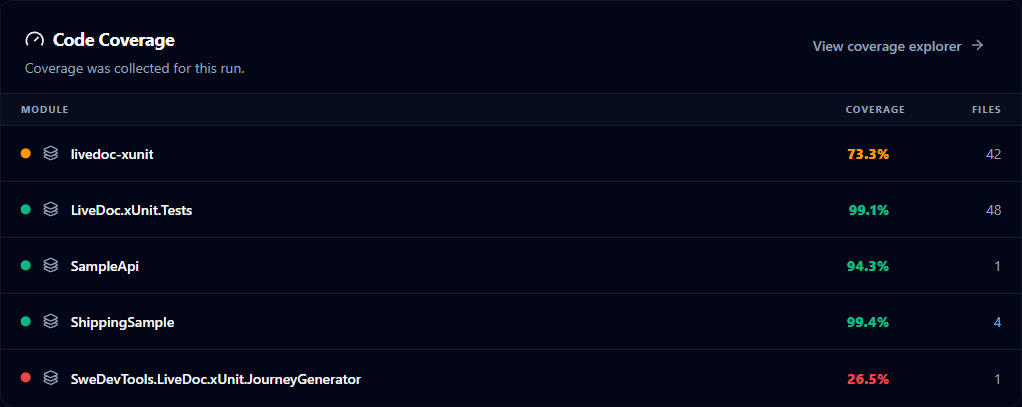
The explorer pivots around projects/modules rather than raw file-system roots. Top-level rows show line and branch percentages, file count, and covered/total lines. Modules are collapsed by default and redundant common path prefixes are removed before you drill into folders.
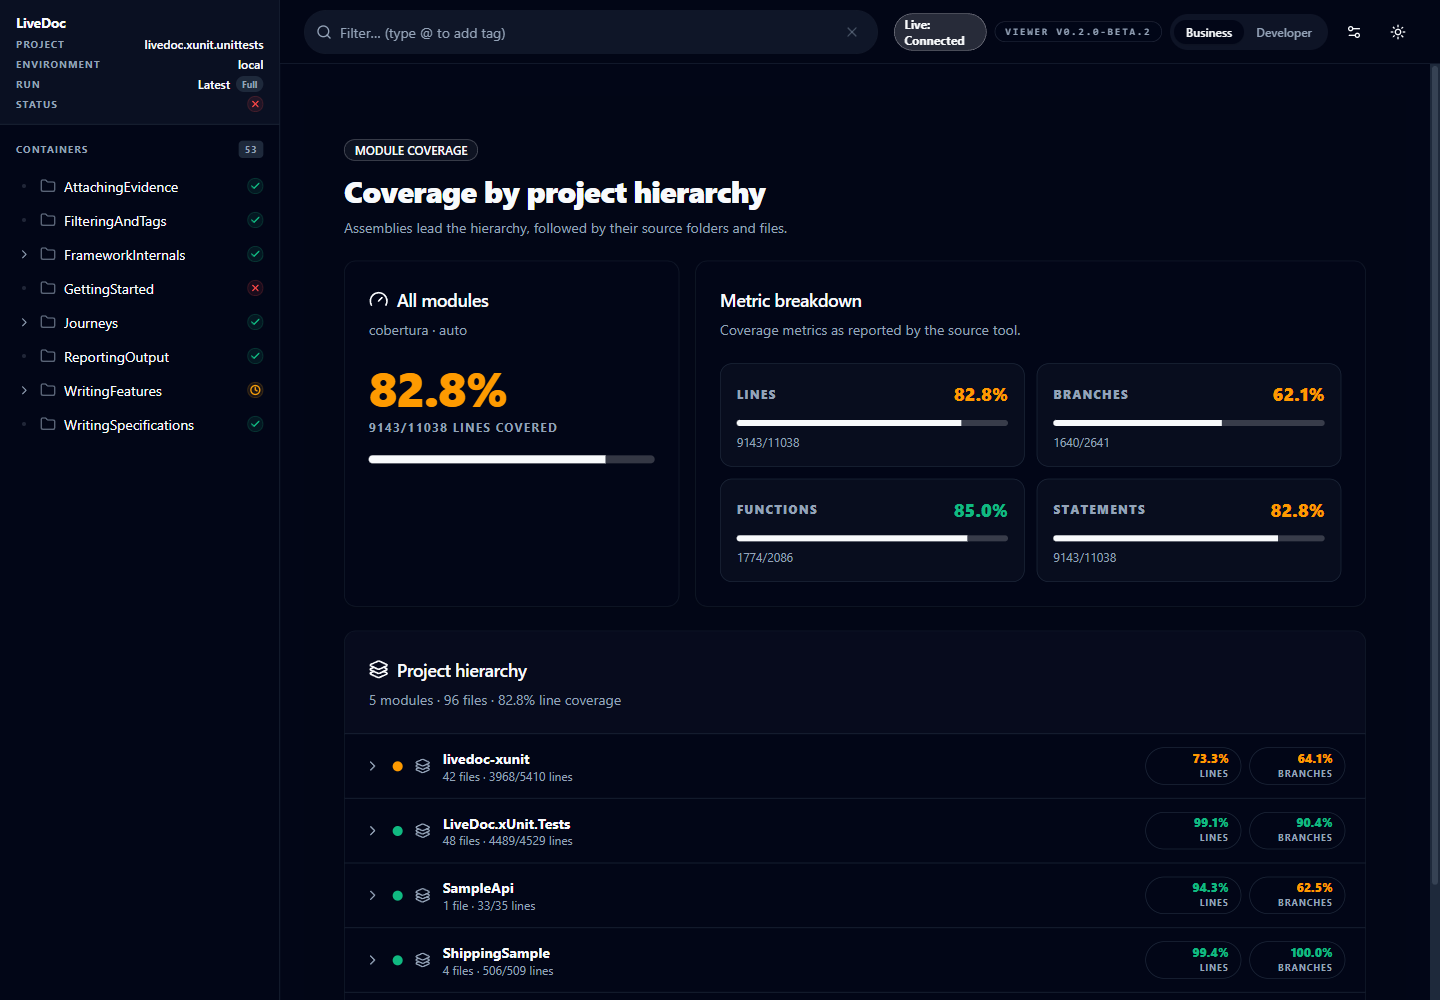
See Code Coverage for Vitest, xUnit, Visual Studio, dependency, and troubleshooting guidance.
Run History
The viewer persists results across runs. The Run menu lets you:
- Browse previous runs with status and timestamp
- Distinguish Full and Partial runs with derived badges
- Choose Combined or This partial when inspecting a completed focused run
- Keep a historical selection stable, or enable Always show latest run
Test results are stored locally in .livedoc/data within your project
directory as JSON files. Results survive server restarts and can be processed
by external tools.
Real-Time Updates
The viewer connects to the server via WebSocket, so results appear instantly as tests execute — no need to refresh. You'll see:
- New features and scenarios appear in the tree as they start
- Step statuses update from pending to passed/failed in real time
- Statistics recalculate after each scenario completes
- Completed logical project groups replace the current selector entry instead of accumulating duplicates
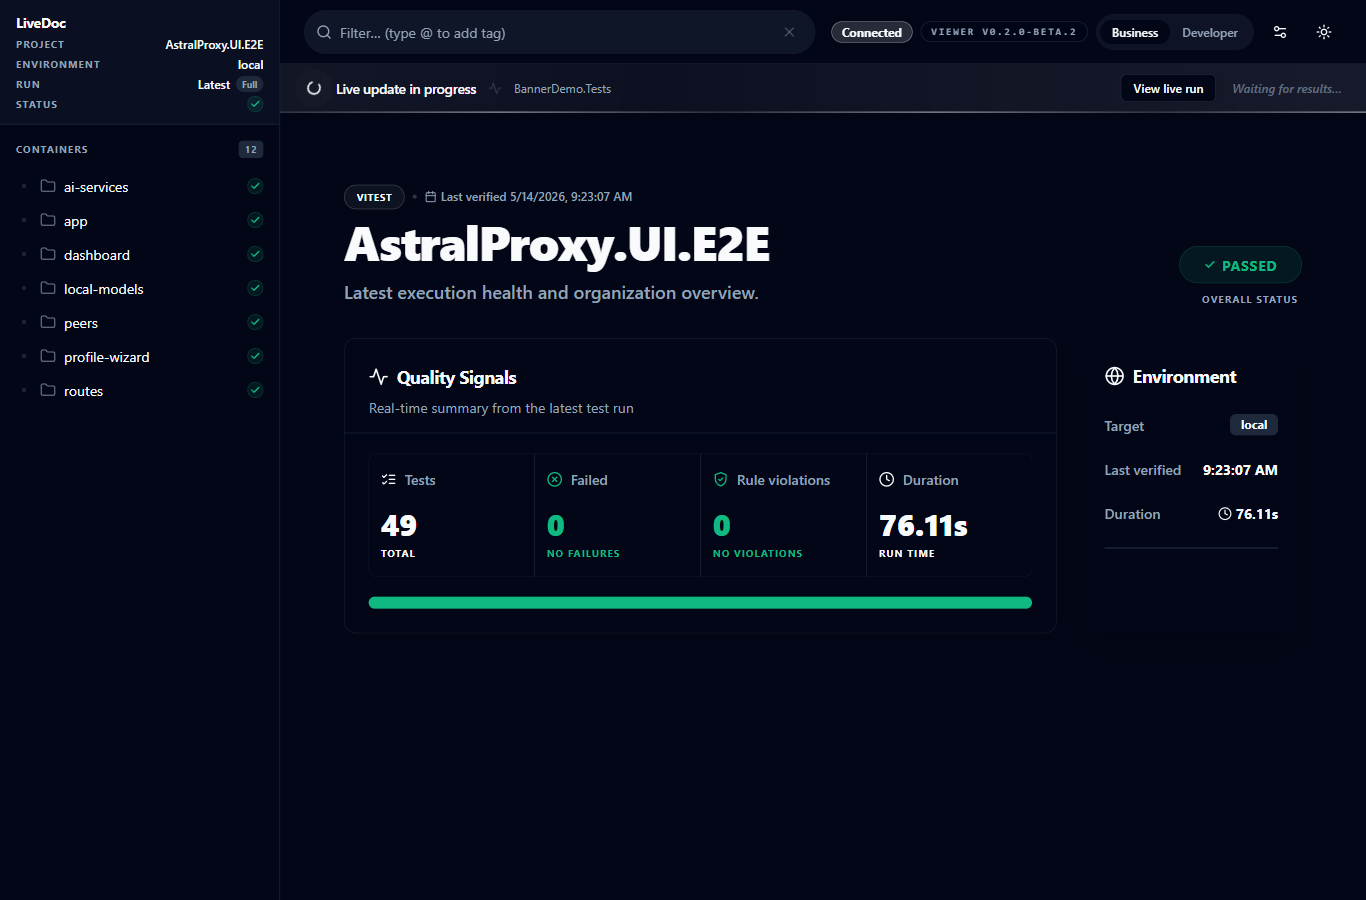
The header badge reports connection health only: Connected, Connecting, Disconnected, or Error. Live test activity always uses the banner below the header. The banner remains visible for raw, partial, and grouped runs even when you are inspecting history, and View live run switches to that active execution. The sidebar uses one running status spinner when the live run is selected.
If the WebSocket connection drops, the Viewer automatically attempts to reconnect. The connection badge changes, while the banner continues to represent test-run activity rather than socket state.
Deep Links
Every browser URL preserves the selected project, environment, exact run or logical group, Combined/physical projection, and current dashboard, coverage, folder, or test view.
Copy the browser address to share the current investigation. Older node-only hash links remain supported, while contextual links prevent an identically named scenario in another run from being selected accidentally.
Key Takeaways
- Project selector filters results by project and environment
- Run selector supports Full/Partial history and optional latest-run following
- Feature tree gives a collapsible, searchable overview of all test results
- Detail panel shows step-by-step results with failure diagnostics
- Quality Signals combine test, rule, coverage, and duration health
- Coverage explorer presents weighted line and branch metrics by module
- Deep links restore the exact project, run, projection, and view
- WebSocket powers instant, real-time updates
Next Steps
- Reference: CLI Options — customize how the viewer starts
- Reference: REST API — query results programmatically
- Guide: Code Coverage — configure Vitest, xUnit, and Visual Studio
- Guide: CI/CD Dashboards — use the viewer in CI pipelines